
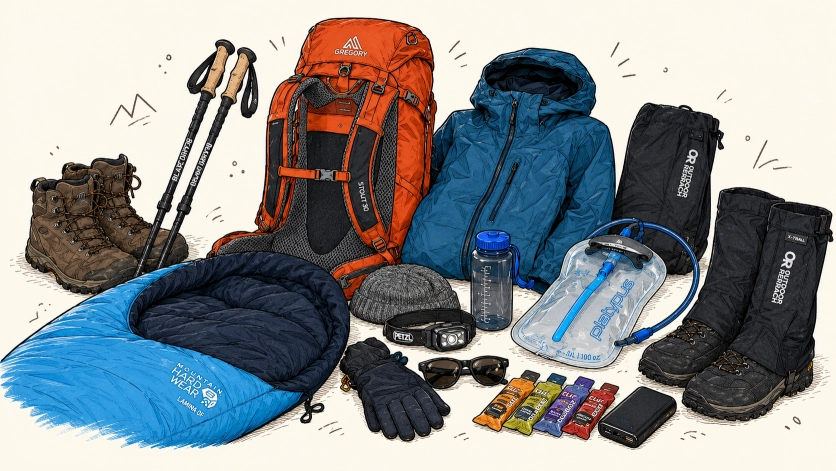

Route: Lemosho | Summit: December 25 | Operator: Ultimate Kilimanjaro | Elevation: 19,341 ft | Days: 8 | Season: December — wet and cold
I spent weeks researching gear before my Kilimanjaro climb. Forums, YouTube videos, blog posts, Facebook groups — I read everything I could find. And still, when I got home, I had a list of things that worked brilliantly, things I wish I’d left behind, and one or two things I wish I’d known about before I packed.
This post is the honest version. Not a gear roundup dressed up as advice, but what I actually used on the Lemosho Route in December, what failed me, and what I’d change if I did it again. I’ve also included answers to the most common questions I got when I shared this in a Facebook group — because those questions told me exactly what was missing from the standard gear guides online.
At the bottom you’ll find a full summary table with every item, brand, and model in one place — and a downloadable printable checklist you can use while you pack.
If you’re in the research phase right now, I hope this saves you some of the confusion I went through.
.
Training for Kilimanjaro — before we talk gear
Gear won’t save you if your body isn’t ready. Here’s what my prep actually looked like.
Weekends: Long hikes with as much elevation gain as I could find near Chicago — mostly Swallow Cliffs and the trail systems around the area. I loaded a 10–15 lb weighted backpack (I literally threw water bottles in) and hiked 10–25 miles. Testing gear on these hikes was just as important as the training itself.
Gym work:
- Stair climbing — very important for both ascent and descent, not just cardio
- Strength: quads, glutes, hamstrings, calf raises
- Core: planks, stability work
- Slow cardio: Zone 2 walks and treadmill incline
Breathing and pacing: I practiced slow, deliberate breathing on long inclines. Pole pole isn’t just a phrase — it’s a technique you need to have internalized before you get on the mountain.
The most important muscles to strengthen are your quads and calves — strong legs protect your knees on descent, and descent is where most people suffer. Shoulders matter too, because carrying a day pack for 8 hours at a time adds up over 8 days.
I did not do any high-altitude training. Chicago doesn’t offer that option. Diamox, hydration, and pacing handled the altitude side of things for me.
Footwear — the most important decision you’ll make
Get this wrong and the rest doesn’t matter.
I wore Salomon Quest 4 high-ankle boots throughout the entire climb. High-ankle matters on Kilimanjaro specifically — the terrain varies enormously across the Lemosho route, from forest mud to rocky scree to summit cold, and ankle support on the descent is non-negotiable. My boots held up across four days of rain, mud, and finally the dry cold above the clouds. Please ensure you have enough toe room may half or 1 size up than your regular shoes. This will help during descent
The sock system was just as important as the boots. I used Injinji liner socks underneath light Smartwool socks — a combination I’d read about but was skeptical of until it saved my toes on the descent. The Injinji toe socks prevent the sock-on-sock friction that causes blisters on long descents.
Pair that with heel-lock lacing and my feet came out of the descent in much better shape than I expected.
Heel-lock lacing — how to do it:
- Lace your boots normally until the second-last eyelet
- Instead of crossing, go straight up into the top eyelet on the same side — this creates a loop
- Cross the laces
- Feed each lace through the loop on the opposite side
- Pull down firmly, then tie
This prevents your heel from lifting inside the boot on steep downhills. It takes 30 seconds to learn and makes a real difference across miles of descent.
Extend your pole length on the descent and increase pace only as much as your knees allow. Poles and lacing together are what get you down in one piece.
Head, face and visibility
These items don’t get enough attention in most gear guides. On summit night especially, everything above your shoulders matters enormously.
Headlamp — Petzl Actik Core Summit push starts at midnight. A reliable headlamp is non-negotiable — not a backup item, your primary light source for several hours. The Actik Core is rechargeable via USB which is practical between camps with a power bank. Keep spare batteries in an inner pocket close to your body; cold kills battery life fast at altitude.
Beanie A warm beanie worn under the hood of your shell jacket. I wore mine from camp evenings through summit night. Don’t skip this in favour of just a balaclava — layering on your head works the same way it does on your body.
Balaclava — Bula (yes, the Costco one) For summit night when wind and cold hit above the clouds. The Costco Bula balaclava did exactly what a much more expensive one would have done. No shame in that.
Neck gaiter — Outdoor Research A thin OR neck gaiter sat between my base layer and jacket collar. Small, light, and genuinely useful for sealing the gap between jacket and face when the wind picks up. I wore it more than I expected to.
Sunglasses — Oakley Prizm Cat 4 Full coverage with no light leaks — this is the spec that matters. At altitude with snow and ice around, UV exposure is serious. Cat 4 is the right rating. Make sure yours wrap fully with no gap at the sides.
The full head system on summit night: balaclava first, beanie over it, hood of the shell over that, neck gaiter sealing the collar gap, Oakleys once the sun comes up. You put it all on in the tent before you start and it stays on.
Layering — summit night and everyday hiking
Let me separate these because they are very different things.
Hiking days (not summit night): I hiked in one pair of pants and two T-shirts, layering up as conditions changed. I kept fresh clothes only for summit night and wore them all the way to the hotel at the end. Everything extra I packed was dead weight. Even when I started a climb feeling cold, after 20–30 minutes I was warm enough or running hot. Don’t over-layer for the hiking days. Keep a rain shell handy on the top of the backpack
Summit night — my full system:
Lower body:
- 250g Smartwool base layer pants
- Fleece-lined Eddie Bauer Alpine Ascent pants over the top
Upper body:
- 250g Smartwool quarter-zip base layer
- REI Sahara hoodie
- North Face fleece jacket
- Mountain Hardwear rain shell
- OR Refuge hooded jacket
Reserve (never needed): Rab Neutrino down jacket — kept in the day pack in case I needed to swap with the OR jacket. I never took it out.
Gloves:
- OR Alpine gloves as the main layer
- REI GTX shell mittens over the top
- Thin liner gloves as reserve — never used
The layering system worked because I opened layers when I felt warm and closed them as needed. Don’t be afraid to start slightly cold — you’ll warm up within the first 20–30 minutes of moving.
For camp (not hiking, not summit): A Patagonia light jacket just for sitting around in the camp between hikes. The operator provided hot water bags at night — one of the most welcome surprises of the whole trip. Toss it in the sleeping bag for warmth. Check if your operator provides them before you pack chemical hand warmers.
Rain gear — non-negotiable for Lemosho in December
I used rain gear heavily for the first four days. Not occasionally. Heavily.
On the poncho vs. jacket question: a poncho keeps your backpack dry and blocks rain from above, but it won’t cover your legs below the knee. Use both: a poncho over the pack in heavy rain, and dedicated rain pants plus shell jacket for full coverage.
What worked:
- REI HydraWall full-zip rain pants — the full-zip matters more than it sounds. You can pull them on and off without removing your boots, which you’ll appreciate when conditions change quickly mid-trail
- Mountain Hardwear rain shell — lightweight, packable, genuinely waterproof. Doubles as a windbreaker on drier days
- REI GTX mittens — waterproof and warm
- Gaiters — I almost left mine (Outdoor Research) at home. Don’t. Mud and wet vegetation on the lower forest sections will soak your boots from the ankle down without them. Lifesavers
On Gore-Tex: for jacket and pants, proper waterproofing matters. Rain that soaks through at altitude is hard to dry out. Don’t cut corners here.
Backpack rain cover: My Gregory Stout 30 pack came with its own rain cover. The straps still got wet, which is where a poncho helped to cover everything more fully.
Poles, packs and trekking essentials
Hiking poles from Day 1. Not from Day 3. Not “when it gets hard.” Day 1. I used Black Diamond carbon poles throughout. If you’re renting poles on the ground rather than bringing your own, make sure the locking mechanism is solid — a pole that collapses mid-descent is worse than no pole.
Hydration system: I carried a 3L Platypus bladder (filled to about 2L daily) plus a 1L Nalgene wide-mouth bottle with Liquid IV mixed in. The bladder had an inline filter when I left home. I ditched it by Day 2 — very hard to suck through, air bubbles constantly forming. The operator boils all water. Trust it.
Target ~3L daily total. At altitude your body needs more hydration than you think, and thirst is not a reliable signal.
Knee sleeves for descent. I put them on before the Base Camp to Mweka Camp push. The descent — Uhuru Peak → Base Camp → High Camp → Mweka Camp in one long stretch — is rocky, steep, and knee-crushing. Knee sleeves won’t save bad knees but they’ll help good knees through it.
Nutrition, hydration and altitude
Diamox from Day 1, taken with serious hydration. I had no AMS issues. Talk to your doctor before the trip — not the week before you leave.
Liquid IV in my Nalgene every day. Kept my hydration in better shape than plain water at altitude, especially on the summit push when appetite drops and drinking feels like a chore.
Energy gels and chews throughout hiking days — graze constantly rather than eating large amounts. At altitude your appetite decreases significantly. Small and frequent works better than three big meals.
Gin Gin ginger candies — especially on summit night. I bought these almost as an afterthought. They were one of my most-used items when nausea crept in during the summit push. Pack more than you think you need.
Vitamin C daily throughout.
On the food: the operator fed us far better and more often than I expected. Hot chocolate, coffee, snacks during hikes, three proper hot meals a day — soups, rice, mashed potatoes, pizza, vegetable curries, fresh fruit. Carb-rich by design at altitude. The chef was the most popular person in our group. The extra food and chocolates I packed were dead weight. Research what your operator provides before packing your own snack bag.
Camp comfort — small things with big impact
Hikenture camping pillow — I’m a side sleeper and needed proper head support. Compresses to almost nothing in your pack.
Sea to Summit sleeping bag liner — meaningful warmth boost inside my Mountain Hardwear 0°F sleeping bag. Cheap insurance if your bag is borderline for the conditions.
On renting gear: my friend rented a Mountain Hardwear -20°F sleeping bag and hiking poles on the ground and was very happy with both. If you don’t own a quality cold-rated sleeping bag, renting is a good option and saves you travelling with it.
Eventek LED camping lantern (rechargeable, available on Amazon) — better than a headlamp alone for organizing inside the tent before early starts.
Power bank — essential. Cold kills batteries fast and you’ll want to charge your phone between camps.
Nalgene Cantene as a pee bottle — the toilet tents at some camps are a cold dark walk away. Practical to have the option even if you choose not to use it.
Operator hot water bags — tucked into the sleeping bag on cold nights, these transformed camp comfort. Check with your operator before packing your own heat sources.
Camera and photography
I brought a Canon 77D DSLR with lenses. It was dead weight.
Four days of rain, mud, cold, exhaustion — pulling out a large camera is impractical on most days. The photos I actually used were almost all phone shots (Samsung Ultra and iPhone).
If I did it again: a good action camera with a chest clip mount and weatherproof case. A Peak Design Capture clip for quick-access on a shoulder strap is worth considering if you do bring a DSLR — but conditions won’t cooperate as often as you think.
What did NOT work
Inline water bottle filters — hard to suck through, constant air bubbles, essentially unusable. Ditched by Day 2. Trust your operator’s boiling.
DSLR camera — covered above. Phone or small action camera is more practical.
Extra food and chocolates — the operator fed us constantly and well. Research what yours provides.
Extra clothes — one pant and two T-shirts for hiking days. Everything extra sat in my duffel untouched.
What I wish I had brought
Camp shoes. Every single morning.
I used Nike running shoes as camp footwear. Tying laces while crawling out of an igloo-style tent in the dark at 2am before summit night — cold hands, sleepy, cramped — was genuinely miserable. North Face Base Camp slip-ons or any similar slip-on shoe would have solved this entirely. It sounds minor. It isn’t.
A note on the porters — and why I’m buying new boots
At the end of the climb I donated my Salomon Quest 4 boots, my JBL Charge 4 speaker, and some jackets to the porters.
The porters on Kilimanjaro are the heart of the climb. They carried our gear, cooked our food, sang us up the mountain at 3am, checked on us constantly, and made the whole experience possible. Donating gear at the end felt like the least I could do — and it’s something I’d encourage anyone to think about before they pack for the descent.
It also means I’m now looking for new boots. I’ll cover that search in a separate Aconcagua prep post — the requirements are different enough (higher altitude, more technical terrain, crampon compatibility) that it deserves its own space. But if you’re in the same position after Kilimanjaro, start that research early. Good mountaineering boots take time to break in.
FAQ — questions from the Facebook group
Do I need Gore-Tex for rain jacket and pants, or will a poncho work? A poncho keeps your backpack dry but won’t cover your legs below the knee. For December Lemosho, proper waterproofing on both jacket and pants is worth it. Use both: poncho over the pack in heavy rain, rain jacket and pants for full body coverage.
Did you rent any gear? I didn’t — I already owned a Mountain Hardwear 0°F sleeping bag. My friend rented a sleeping bag and poles on the ground and was very happy. If you don’t own a good cold-rated bag, renting is a perfectly reasonable option.
How was the food? Can vegetarians eat well? Better than expected. My friend was a strict vegetarian and was well taken care of throughout. The food is carb-rich by design — soups, rice, potatoes, pizza, curries, fresh fruit. The chef was the most popular person in our group.
Was garlic soup served for acclimatization? Not specifically. Soups often contained ginger or garlic as ingredients. The main acclimatization method was climb high, sleep low — combined with ~3L of water daily. I took Diamox throughout.
What time did you return to the hotel after summiting? Mweka Camp to Mweka Gate took about 4 hours walking slowly. We reached the hotel around 2–3pm after stopping for lunch and souvenir shopping. There was also a tipping ceremony and certificate distribution — expect to be free around 4–5pm. The airport is about an hour from Moshi. A 9am departure the following morning is workable.
Was there snow? Not during our summit push. A group before us got snow and flurries. December can go either way.
Did you wear ski goggles or Cat 4 sunglasses? Oakley Prizm Cat 4 with full coverage and no light leaks. They worked well after sunrise. If blizzard conditions are possible, goggles are worth having as backup.
What high-altitude training did you do? None specifically. I live near Chicago so I trained at Swallow Cliffs and local trail systems. Stair climbing, weighted backpack hikes, strength work for quads, glutes, and calves. Strong legs protect your knees on descent — that’s where most people suffer.
How tough is the summit push? Our push started at midnight. Between 3–5am it was genuinely hard — sleep deprivation hits on top of altitude and cold. The guides sang and encouraged us throughout. The summit push itself is manageable because the pace is pole pole throughout. The descent was harder for me — Uhuru Peak to Mweka Camp in one stretch is long, rocky, and knee-crushing. Heel-lock lacing, extended poles, and knee sleeves are non-negotiable.
Full gear summary table
Use this as your shopping and packing reference. Affiliate links marked with *.
| Category | Item | Brand & Model | Notes |
|---|---|---|---|
| Footwear | Hiking boots | Salomon Quest 4 | High-ankle, essential for descent |
| Liner socks | Injinji | Toe socks — prevents blisters | |
| Mid socks | Smartwool light / medium | Over Injinji liner | |
| Knee sleeves | Copper Fit | For descent — put on before Mweka push | |
| Camp shoes | North Face Base Camp slip-on | Wish I had brought — don’t skip | |
| Gaiters | Outdoor Research | Lifesaver in mud and rain | |
| Head & face | Headlamp | Petzl Actik Core | Rechargeable via USB, keep spare batteries warm |
| Beanie | Outdoor Research | Worn under shell hood | |
| Balaclava | Bula (Costco) | Summit night — does the job | |
| Neck gaiter | Outdoor Research | Seals collar gap on summit night | |
| Sunglasses | Oakley Prizm Cat 4 | Full wrap, no light leaks | |
| Upper layers | Base layer top | Smartwool 250g quarter-zip | Summit night |
| Mid layer shirt | REI Sahara hoodie | Summit night | |
| Fleece | North Face fleece jacket | Summit night | |
| Rain/wind shell | Mountain Hardwear | Daily use + summit | |
| Insulated jacket | OR Refuge hooded jacket | Summit night primary insulation | |
| Reserve down jacket | Rab Neutrino | Summit night backup — never needed | |
| Camp jacket | Patagonia Nano light jacket | Camp use only | |
| Lower layers | Base layer pants | Smartwool 250g | Summit night |
| Hiking pants | Eddie Bauer Alpine Ascent fleece-lined | Summit night | |
| Rain pants | REI HydraWall full-zip | Full-zip detail is important | |
| Gloves | Insulated gloves | OR Alpine | Summit night primary |
| Shell mittens | REI GTX | Over OR gloves | |
| Liner gloves | Northface | Reserve — never used | |
| Poles & pack | Trekking poles | Black Diamond carbon | From Day 1, extend for descent |
| Day pack | Gregory Stout 30L | Came with rain cover | |
| Poncho | Walmart one | Over pack in heavy rain | |
| Hydration | Soft bladder | Platypus 3L | Skip the inline filter |
| Water bottle | Nalgene wide-mouth 1L | For Liquid IV | |
| Electrolytes | Liquid IV | Game changer at altitude | |
| Nutrition | Altitude medication | Diamox | Prescription — talk to your doctor |
| Energy | Gels and chews (Honey Stinger) | Graze constantly | |
| Nausea | Gin Gin ginger candies | Essential for summit night | |
| Supplement | Vitamin C | Daily throughout | |
| Camp comfort | Sleeping bag | Mountain Hardwear 0°F | Or rent -20°F on the ground |
| Liner | Sea to Summit | Meaningful warmth boost | |
| Pillow | Hikenture camping pillow | Side sleepers — don’t skip | |
| Light | Eventek LED lantern | Better than headlamp alone in tent | |
| Power | Power bank | Cold kills batteries fast | |
| Pee bottle | Nalgene Cantene | Optional but practical | |
| Photography | Phone | Samsung Ultra / iPhone | What I actually used |
| Camera | Canon 77D with 10 – 18mm, 18 – 135mm and 55-250mm lenses | Get an Action camera like Go pro + chest mount instead + may be Sony light weight cameras |
[Download the printable checklist — PDF]
What this means for Aconcagua
Kilimanjaro at 19,341 feet was my first serious high-altitude expedition. Aconcagua stands at 22,838 feet — nearly 3,500 feet higher, longer duration on the mountain, and far more extreme cold.
What I’m carrying forward: the sock system, Black Diamond poles, Platypus hydration, Liquid IV, ginger candies, Sea to Summit liner, the head layering system, and the camp shoe lesson. These all proved themselves.
What I’ll need to research and buy from scratch: new boots (the Salomon Quest 4s went to the porters), a down suit for high camps, a warmer sleeping bag, mountaineering crampons, and an ice axe. A different category of gear entirely.
That research is going into a separate post. Aconcagua prep deserves its own space.
Planning your own Kilimanjaro climb? Happy to answer questions in the comments. And if you want to read how the climb itself went — the route, the summit night, the guides who made it possible — that story is here: Kilimanjaro Lemosho route Summit.